| Downloads | Overview | On Line Books | Licensing |
What is Eclipse?
Eclipse is primarily an integration platform for tools and other kinds of client applications. It is also a Java development environment and an open source community.
It allows for the co-existence of independent tools in a consistent and cohesive manner. It makes modeling, design, programming, testing and more work together in an effecient and productive manner. It allows for the ability to create, manipulate and manage sets of software objects.
It does this by providing an architecture and a set of Java frameworks that make creating and maintaining integrated tools easier. It also provides a consistent way for tools to contibute to the user interface, package and deploy new functions, and offer online help.
Eclipse provides support for groups of developers through integration with SCM repositories. It has embedded support for CVS.
Eclipse supports many platforms: Windows, Linux, Apple Mac OS, and most Unix systems. It is internationalized with translations in over eight languages, with more being added. It also has accesibility options for handicapped individuals.
All user actions are available from menu bar items. Below the menu bar is the toolbar which contains icons which are shortcuts to some of these actions.
Editors
Editors allow you to create and change resources and are associated with a specific resource type (usually defined by its file name extension - after the right most period). The editor opens in a pane whose position is defined by a perspective.
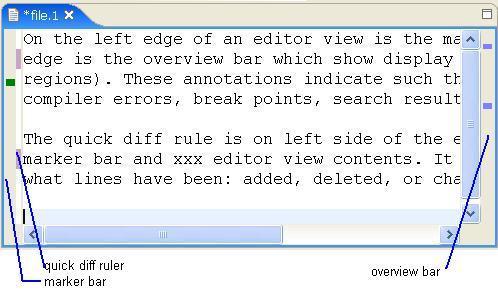
On the left edge of an editor view is the marker bar and on the right edge is the overview bar which show display annotations (as colored regions). These annotations indicate such things as: boomarks, tasks, compiler errors, break points, search results and so on.
The quick diff rule is on left side of the editor view between the marker bar and the editor view contents. It uses color to indicate what lines have been: added, deleted, or changed.
Views
A View presents a way to navigate through resources or other information in Eclipse and is part of a Perspective. A View can also allow you to make changes to resources, such as renaming or editing them. An Outline view shows the structure of the contents of the file being edited. Even though these objects are called "views", you can use them to change resources rather than just examine them.
Views can be resized, stacked, tiled, torn off, and placed on the fast view bar. The Properties view (for example) displays, and lets you change, the properties of the file or resource, such as its size and date.
A view which has been "torn-off" is one that that has been removed from the main Eclipse window and is now free floating (i.e. it can be independently moved around and resized. To "tear-off" a view select by its tab and drag it outside the Eclipse window (it will show an outline when this is possible) and let go. To restore it, drag it back into the Eclipse window and drop it where you want it (by observeing the mouse cursor indicating where it will go in relation to the view under the cursor).
The fast view bar holds icons for the views you have made into fast views. A fast view is created when you take a view off the main window and save it as an icon on the fast view bar. By default the fast view bar is on the bottom of the main Eclipse window.
A view is moved to the fast view bar by either:
- right clicking on the tab of a view and selecting Fast View, or by
- left clicking on the tab of the view and dragging it to the fast view bar.
A view removed from the fast view bar and restored to its former position by right clicking on its icon on the fast view bar and clicking on the checked Fast View item.
To change the position of a view left click on its tab and drag it around. The mouse cursor will change to an arrow shape which indiacates the position the view will end up in relative to the view the mouse cursor is over.
Some views, e.g. tasks, have an icon in their tool bar to filter what items in the view are displayed or not.
To the right of the fast view bar (i.e. in the central position of the bottom edge of the Eclipse window) is the message area. Information is displayed area based on the active view or editor and your current selection. To to the right of the message area is the progress area (on the rightmost side of the bottom edge of the Eclipse main window) which shows the progress of operations running in the background.
Perspectives
A perspective in Eclipse defines a set of editors and views arranged in an initial layour for a particular task or role. For example the Debug perspective is designed for the task of debugging source code. Eclipse has the following perspectives:
- Resource
- Java
- Java Browsing
- Java Type Hierarchy
- CVS Repository Exploring
- Debug
- Team Synchronizing
- Plug-in Development
A tabbed list of perspectives typically appears on a bar to the right of the tool bar (just below the menu items). By right clicking on the perspectives bar and selecting Dock On one can then choose the position of the perspectives bar to be:
| Position | Click On |
|---|---|
| horizontally to right of toolbar | Top Right |
| horizontally under toolbar | Top Left |
| vertically on left edge | Left |
When the perspectives bar is horizontally to the right of the toolbar (Top Right) its width can be changed by right clicking on its left edge (the cursor will change to a bi-directional horizonatal arror and dragging that edge to the left or right.
It is possible create a customized perspective for the way you like to work with particular views an organization (position and size). From the menu bar select Window => Save Perspective As... and give it a name. Now when you select Window => Open Perspective you customized perspective appears in the list. You can delete a perspective you defined above (but not one delivered with the system) by selecting: Window => Preferences => Workbench => Perspectives select your user defined perspective click Delete => OK
Preferences
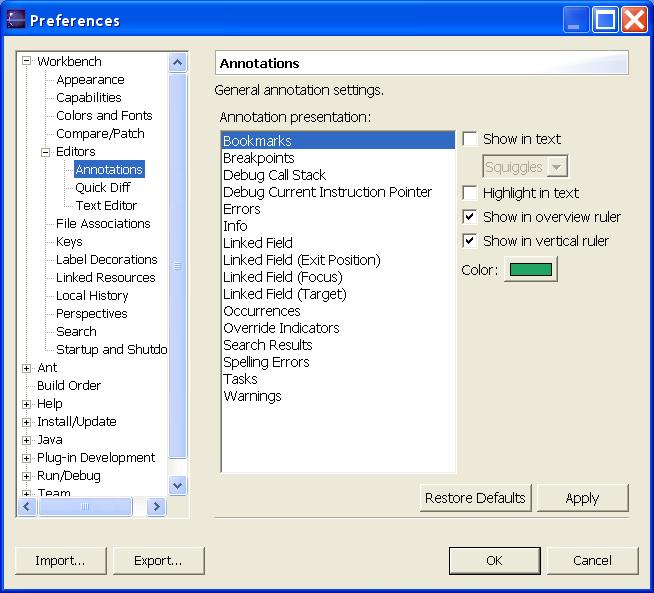
Preferences allow you to change the appearance or behavior of everything from fonts and colors to settings for opening new views and perspectives and file type associations. The preferences dialog is accessed from the main tool bar by clicking on: Window => Preferences. The categories of things with preferences is oraganized as a collapsible-expandible tree on the left side of the dialog. Select an item in that tree and then the detailed choices for that item are available on the right side of the dialog for examination or making changes.
The total set of preferences can be exported to a file or imported from a file using the Import... or Export... buttons on the lower left of the preferences dialog. The file named preferences.epf contains the default setting. An individual Eclipse system may have this dialog modified in various ways including not having the Import and Export buttons.
Any other tools or things added to Eclipse will have their preferences appear in this common preferences dialog.
Projects
A project is a special folder that exists in the current workspace directory. Projects cannot be nested, but there can be multiple workspaces. There is always a defined default workspace directory. To switch workspace use the menus and click on:
File => Change Workspace
fill in the path and click on Ok.
To create a new project use the menus and click on (for example):
File => New => Project => Simple => Project
then fill in the project name and click on Finish.To see Navigator View (if not already showing) use the menus and click on:
Window => Show View => Navigator
Projects contain files and folders. Folders contain files and other folders. To add a folder, in the Navigator View, right click on the project or a folder within the project and choose:
File => New => Folder
fill in the folder name and click on Finish. To add a file to a project or a folder (within a project), in the Navigator View, right click on the project or folder and click on:
File => New => File
fill in the file name and click on Finish.To copy existing files into a project, in the Navigator View, right click on the project name or a folder name and click on: Import... select the source using the import wizard. In Windows you can also drag and drop files or folders from windows file explorer into the Navigator View which will also copy files and folders.
Every project always contains the file .project which is an XML file with information about the project.
To work on a file, in the Navigator View, right click on the file name and select open, or simply double click the file name. Eclipse uses file type associations defined by your computer (and OS) to know what program to open the file with. Frequently this program is an Editor.
Usually a project contains all of its resources (folders and files), Eclipse allows for linked resources which exist outside a project. To enable this capability, starting with the menu bar click on Window => Preferences => Workbench => Linked Resources check Enable linked resources.
Be careful when cleaning up because if you delete a linked file or folder you delete only the link. However if you open a linked folder and delete a file or folder you are deleting the actual file or folder.
In addition to location and resources, projects have twoo other properties: Builders and Project References. Project References are a way to keep track of projects that refer to other projects. This property is set so that hwne the resources in a project change, Eclipse can process other projects that refer to the changed project.
Properties
Every item in the Navigator View has properties which can be accessed (to see or modify) by right clicking on them and selecting Properties.
Tracking Mechanisms
Tasks, bookmarks and problems are tracking mechanisms that may associate information with resources in projects. These three mechanisms each have their own view and with their own associated editor.
Tasks are textual reminders. They have a completion status and priority, and may or may not be associated with a specific resource. New tasks can be created with the "add task" icon on the upper right part of the view and can be deleted with the "delete" icon. A new task can also be created by right clicking in the marker bar of an editor in which case the task will show up in both the task view and as an icon in the marker bar of the editor at the position associated with that file. Bookmarks exist in the marker bar of an editor by right clicking in the marker bar of an editor and then selecting Add Bookmark....Problems are warnings and errors Eclipse detects as you work, and are not created by you. They appear in the overview bar of an editor.
Capabilities
Capabilities is the general term used in Eclipse for activities using such things as wizards, perspectives, and preferences.
Background Processing
Eclipse provides the ability for work to be done in the background so that you arenot prevented from doing other work. For example CVS repository actions such as check out or update can be performed in the background. When you perform an action that is enabled for background processig you will get a prompt giving you the option to: do nothing till its done, or click on Cancel or Run in Background.
If you want all operations enabled for background processing to run in the background without prompting, then from the main menu bar select Window => Preferences and check the Always run in background check box. The progress of background processing is shown in the progress area on the lower right bar of the Eclipse window.
Click on Progress view icon on the progress bar to open the Progress view to see detailed status. When a background operation is not yet done its name is shown in italics, when it has completed the name changes to bold.
Print Page
Prints the pane whose Print Page icon is been selected. In some case there will be a choice of what to print which will pop up when the icon is cliked on. If there is a single shared print page icon then it applies to the currently selected pane. The icon will not be clickable if the selected pane is not printable.
Error view
To enable the error view from the menu bar clock on Window => Open Perspective => Other ... => Plug-in Development => OK. The error log in the view can then be exported to a file by clicking on the Export Log icon and choosing a path and file name in the usual way with the file dialog.
Help
There are the following froms of help available.
Online Documentation
From menu bar click on Help => Help Contents then fill in a query. First time will take longer to create help index.
Infopops
To view inline help for a specific item in the user interface, shift focus to the user interface item and press F1.
Hover Help
To quickly see information about an interface item, e.g. an icon, hover (i.e. suspend) the mouse cursor over the item without moving it and a short description, called hover help, will display.
Cheat Sheets
When information needs to be presented as a nontrivial sequence of steps, Eclipse will display the information in the form of a cheat sheet, which will show up in its own view. For example, from the Eclipse welcome page, if you select Tutorials, they are implemented as sheet sheets.
External tools
External tools are computer programs not specifically designed to work with Eclipse, but that you define to invoke from Eclipse. You can pass information from your workspace, have the tool output sent to the Console view, and have your workspace refreshed when the tool completes. You can use external tools to do backups, publish web pages, run Ant scripts, and more.
To add, edit or remove external tool definitions, from the menu bar select Run => External Tools.... From here you can select a tool and Delete it or add a New one, or edit an existing one.
On the Main tab you specify a Name for for the extern tool configuration, the Location and Working Directory and optionally Variables... to use instead of direct references. The variable values include ones you have defined in your Run/Debug => String Substitution preferences. To passworkspace values like project and resource name and location, select Variables... for Arguments.
On the Refresh tab you can select all or parts of the workspace to refresh when the tool finishes. This is necessary only if the the external tool program adds, deletes, or changes resources in your workspace.
The Environment tab gives a way to to specify environment variables.
The Common tab gives the option to launch the program in the background, so that you can do other work at the same time.
Builders
A builder is a program that runs when a resource changes. In Java projects, builders are used to compile the Java source files. Builders are project specific. To define a builder for a project, right click in the Navigator view on a project and select The Properties => Builders => New.. => Program, or Ant Build or whatever, and fill in the dialog.
To determine if a build should automatically take place, in the menu bar click on Window => Preferences => Workbench click to check Build Automatically. When this is disabled, i.e. it is a manual build, you can explicitly perform a build by selecting from the menu bar Project => Build All. If the state of things gets inconsistent then first do a clean by selecting from the menu bar click on Project => clean... then choose Clean all projects or Clean selected projects.
Plugins
- Graphical Editor Framework (GEF)
On Line Books (and other Documentation)
For the following books goto the Eclipse documentation page.
| Title | Purpose |
| Workbench User Guide | for users: how to use Eclipse |
| Java Development User Guide | for Java developers: how to use Eclipse to write and debug Java code |
| Platform Plug-in Developer Guide | how to extend and build offerings based on Eclipse |
| JDT Plug-in Developer Guide | how to extend and build offerings based on Eclipse |
| PDE Guide | how to extend and build offerings based on Eclipse |
Licensing
Eclipse is offered under the Common Public License (CPL), a license compliant with the Open Source Initiative (OSI). The CPL permits effective commercial use of the software under license and provides royalty-free source code and worldwide redistibution rights. For more information see "Legal Stuff FAQ".
2007-2012